Video on the Canvas
The canvas accepts video as well as images and 3D models. A video becomes a layer of its own, with a menu tailored to video.
Adding a video
Use Import (Cmd/Ctrl + I) and choose Video, or drag a video file straight onto the canvas. Supported formats: MP4, WebM, MOV, and MKV. A file has to stay under 250 MB, and its frame has to fit a 4096 by 4096 pixel budget, so a wide 4096 by 2160 clip passes while true 8K is rejected. See Canvas & Views for all import options.
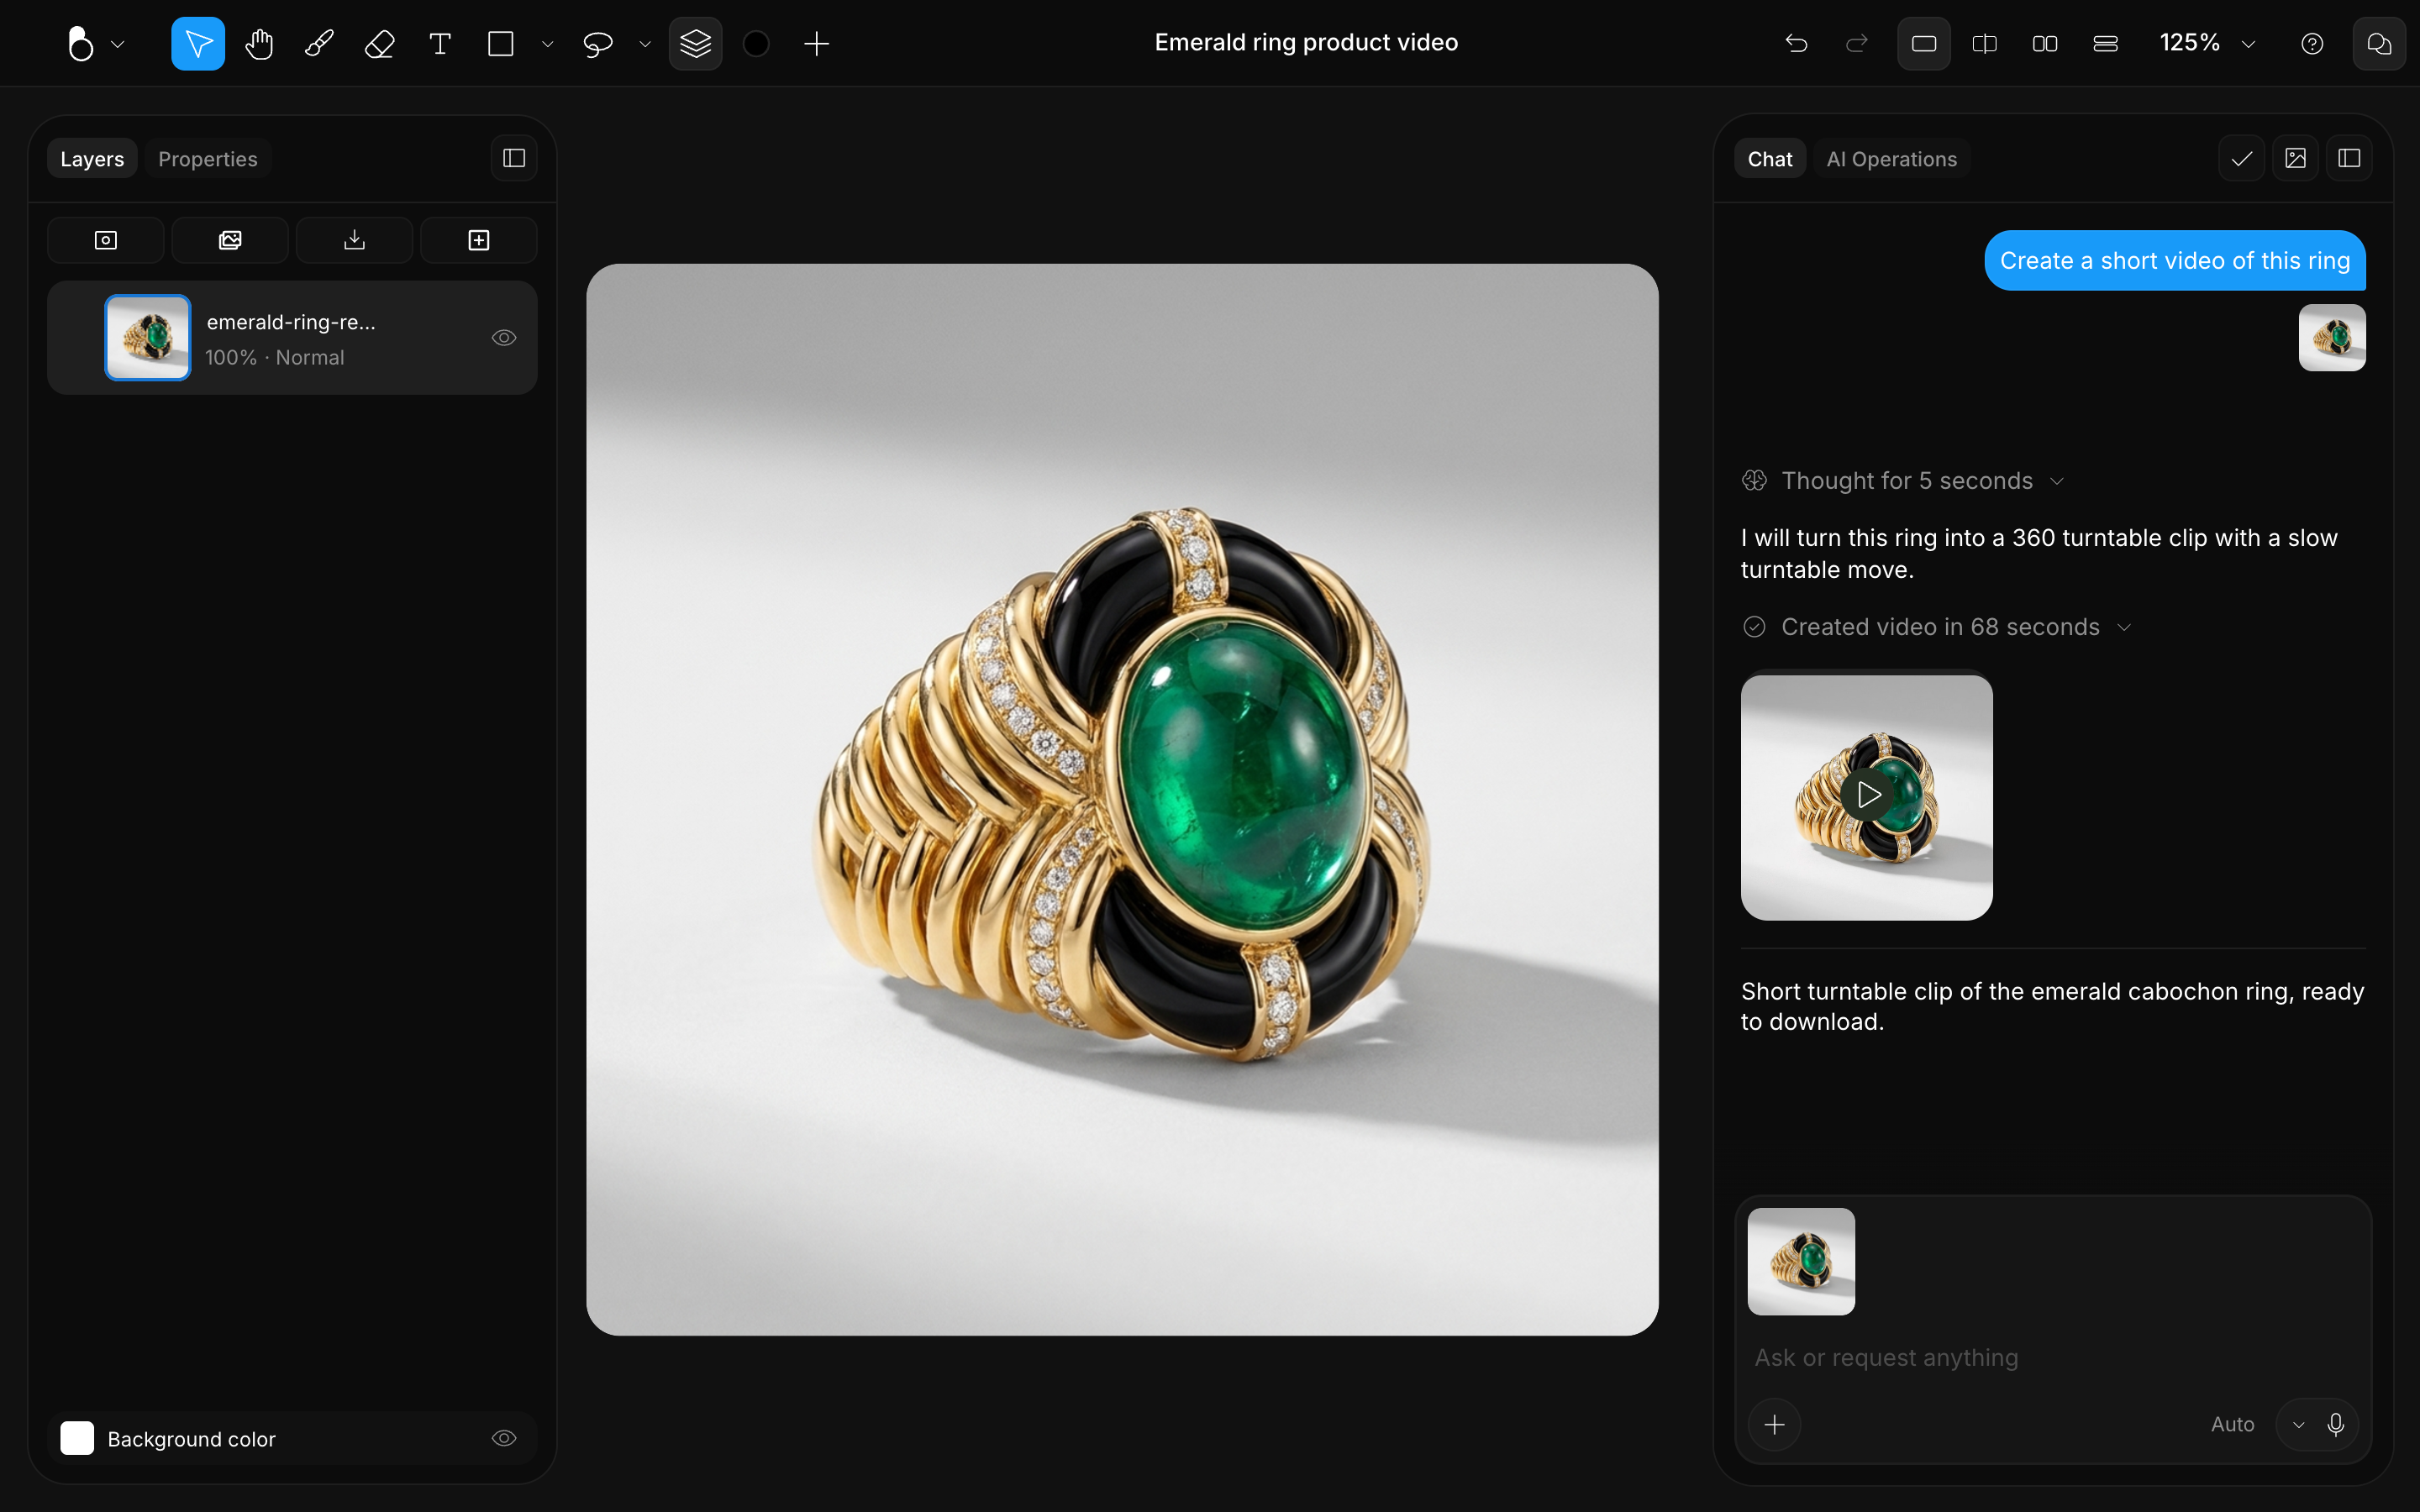
The Chat can also generate a clip from a design, and it lands here the same way. See Generating a video below.
Generating a video
There are three ways to work with video in BLNG: make a clip from an image, bring in a video you already have, or change an existing clip. All three run in the cloud, and the result lands in the chat as a video tile. New clips and edited clips come back in full HD (1080p); ask the chat to upscale a video to 4K when you need more.
Heads up
Tell the chat what to work from. Add the image or the video to the chat before you ask (see Adding a video to the chat below). If nothing is attached, BLNG works from the canvas thumbnail, a single still of everything on the artboard: an existing video would not be edited, you would get a new clip made from that still. That still shows the board exactly as you see it, so a paused video is captured at the frame you paused on (see Starting from a paused frame below).
From an image
The quickest route is the image’s own menu. Right-click the image on the canvas, in the Layers panel or in the chat, choose AI Tools › Generate video and pick a camera move: Turntable, Slow push in, Orbit, Contour flyover or Macro drift. The clip is always made from that image, and the job shows in the AI Operations tab.
For more control, ask in the chat: add the image to the chat, then describe the motion in words (“a slow turntable of this ring, light glinting across the stones”). With one image, that image becomes the first frame of the clip. You can attach more than one image. The first image you add is the start frame, the last one is the end frame, and anything in between guides the motion along the way. Say it in the prompt too, for example “start on image 1 and end on image 2”.
From a video you already have
Bring the video in first: on the canvas with Import (Cmd/Ctrl + I) › Video or by dragging the file onto the canvas (see Adding a video above), or straight into the chat by dropping the file on the chat panel or choosing it with the Add references (+) button, whose picker takes images and videos. On iPad and iPhone, pick it from Photos or Files. MP4, WebM and MOV go in as they are; other formats are converted on the way in.
Once the video is in the chat, BLNG works on that clip: it changes what you ask it to change and keeps the rest (see Changing an existing clip below). For a new camera move that starts on a moment from that clip, pause on that frame and generate from it (see Starting from a paused frame below).
Changing an existing clip
Add the clip to the chat and describe the change: “make this video slower”, “warmer light on the metal”, “put it on a dark marble background”. A clip generated earlier in the same chat can be addressed directly (“make the previous video slower”). Edited clips and new clips come back in full HD (1080p); ask the chat to upscale a video to 4K if you need more (“upscale this video to 4K”).
Starting from a paused frame
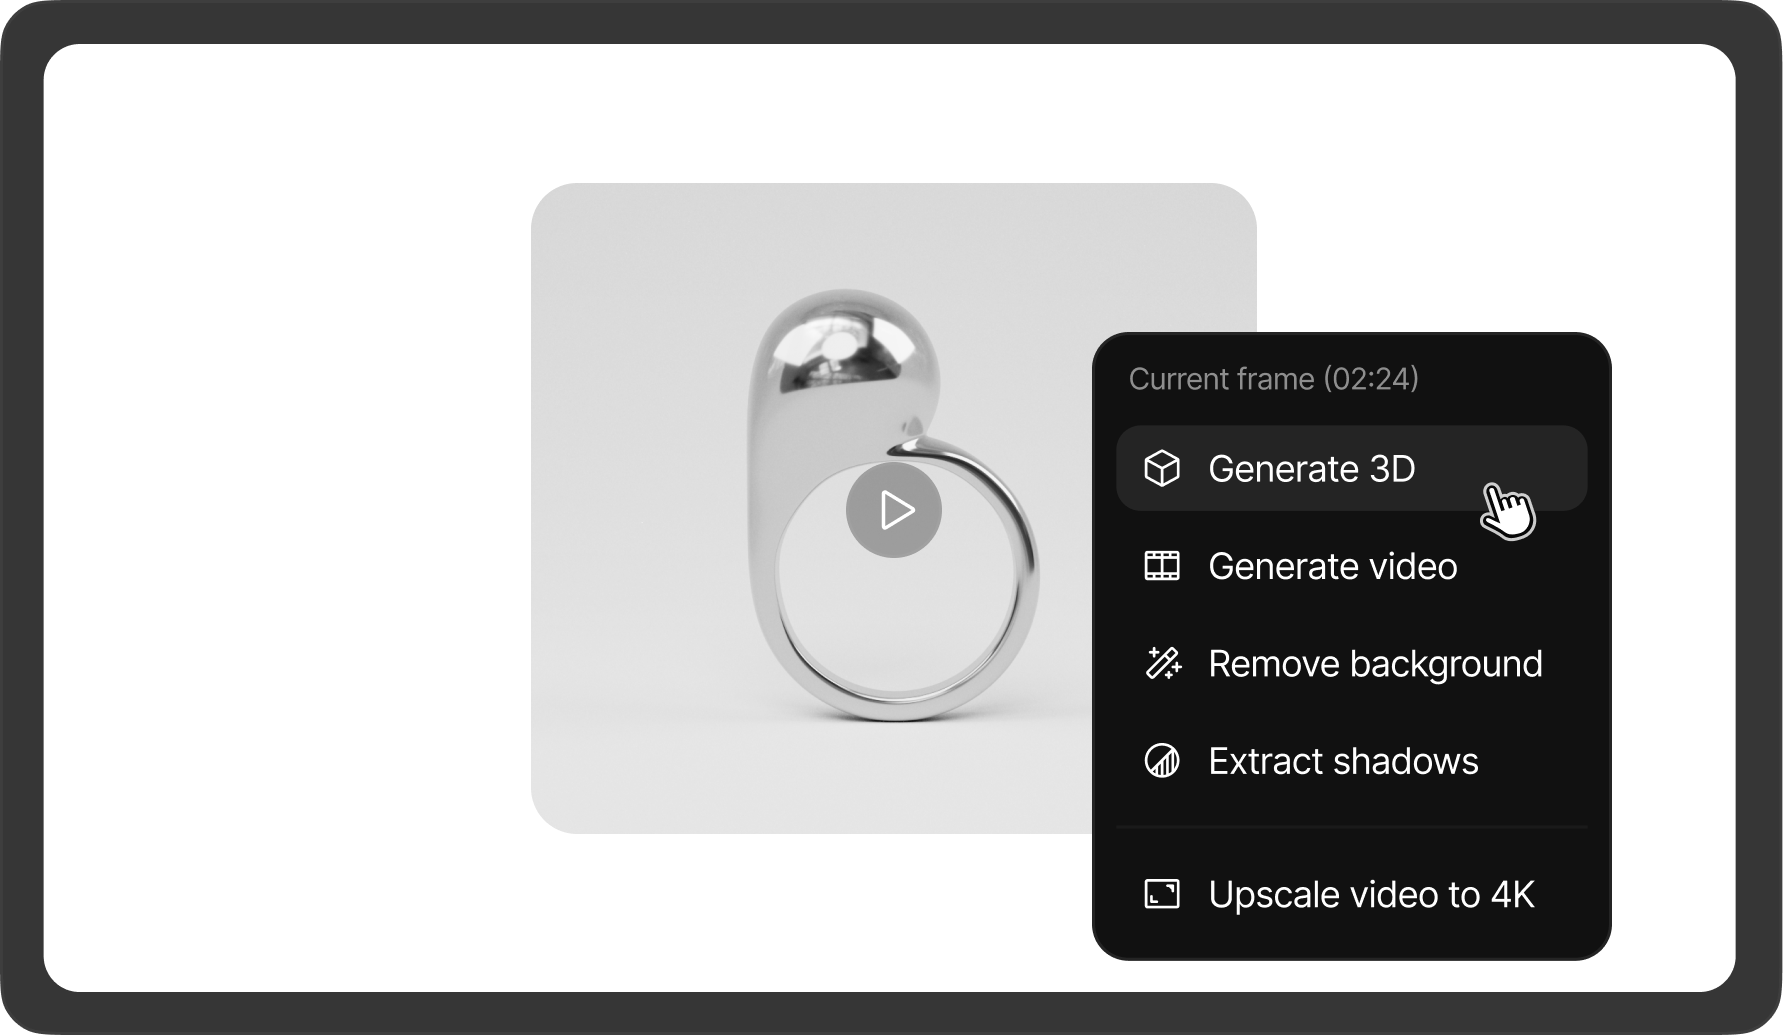
Scrub the clip on the canvas to the frame you want, pause, then right-click the video layer and choose AI Tools › Generate video (under Current frame); that frame is the start frame of the new clip. The chat works the same way: with nothing attached, the artboard still is captured with the video at its paused position, so the paused frame is what BLNG works from.
To keep the frame as an image, right-click the paused clip and choose Merge › Flatten: the current frame becomes an image layer you can use as a start frame, an end frame or a reference, and drag into the chat. The frame tools in AI Tools save the frame the same way before they run (see AI Operations on a video below). A 3D layer flattens the same way, to a still of the view you have on screen.
Adding a video to the chat
Drag the video’s row from the Layers panel, or its tile in the chat, into the chat panel; or right-click either and choose Use as reference; or drop a video file from your computer on the panel. The clip joins the reference row like an image, with its own influence dial and eye toggle. On iPad and iPhone, long-press the clip and choose Use as reference, or attach a file from Photos or Files. See Reference Images.
While it generates, and if it fails
A tile with a film-strip badge shimmers in the chat while the clip renders; a clip made from the image menu also shows in the AI Operations tab. BLNG does not retry a failed video on its own: use Try again on the tile or on the failure notice, or in the AI Operations tab if the clip came from the image menu. On the chat tile of a clip made from the image menu, Try again asks you for the camera move again. Each request is a fresh clip, so you lose nothing by iterating; asking again with a sharper description works too. See AI Operations.
When the clip is ready, the tile becomes a live preview: hover to play a quick scrub in place, click to open the full player with playback controls. You can also drag the tile into the composer to use the clip as a reference for the next request. The tile carries its own Add to canvas button, and right-clicking it opens the rest of the actions, things like downloading the clip, copying a frame, or copying the prompt that made it.
Add to canvas turns the clip into a video layer of its own, centered on the canvas, looping and muted. From there it behaves like any imported video: its own menu, download options, and layer controls.
The video menu
Right-click a video layer to open its menu: the usual layer actions, plus the entries that only make sense for video. Under Export you can download the clip as MP4 or WebM, handy for handing off a clip in the format your channel needs. WebM is the one to pick when the clip is cropped to a shape, because it keeps the transparent corners. Downloading from the chat tile instead saves the clip as it was generated, an MP4. All plans can download videos. On iPad and iPhone, a clip’s menu offers Save to photos and Export instead; WebM is only on the web. Under AI Tools you’ll find tools for the paused frame and for the whole clip; see AI Operations on a video below. For a start-to-finish recipe, from polishing the still to a channel-ready clip, see Create a Product Video.

AI Operations on a video
Right-click a video layer and open AI Tools. The top group is labeled with the time you paused at, for example Current frame (0:05), and its four tools work on that frame: Generate 3D, Generate video, Remove background and Extract shadows. Each first saves the frame as a new image layer named after it, such as Frame 0:05, and runs on that: Remove background, for example, leaves you Frame 0:05 · Background removed. Generate video makes a new clip that starts on the paused frame. Below the divider, Upscale video to 4K upscales the whole clip; you can also add the clip to the chat and ask “upscale this video to 4K”. To upscale one frame as an image, flatten it first and run Upscale to 4K on the image. See AI Operations.